This is a guest post written by Tej Pratap Shukla, a Server Administrator from New Delhi, if you like the article, be sure to visit Office 365 Tips. Without further delay, over to Tej...
In this post, how one can add disclaimer to all outgoing emails in Office 365/Exchange Online manually without any expert is discussed. One just simply needs to follow the method and add disclaimer to the emails to ensure security, confidentially, the liability of email content.
Email is the important business tool used by many organizations. However, using emails without any signature and disclaimer is like giving an invitation to the number of legal threats. Therefore, from the security point of view, it is important to attach a disclaimer to every outgoing email from Office 365/O365. Now, what exactly is email disclaimer? It is the statement that is added to all emails sent from a particular organization. It is usually added to disclaim liability or marketing purpose as well. Moreover, the disclaimer statements are mainly of legal characters drafted by the legal department of an organization. Now, to make it more easy for IT administrator, these disclaimers can be managed through central location also and can be added to each email automatically using Office 365 Transport rules. These IT administrators can easily manage Office 365 Admin accounts from a single panel using a third-party service. After understanding the main reason behind applying a disclaimer, method of how to add disclaimer to all emails in Exchange Online is discussed.
An Example of Disclaimer:
The content of this email is confidential and only for the recipient that is specified in the message. It is strictly prohibited to share any content of this email message with any of the third party, without having a written consent provided by the sender. In case you received this message by mistake, then please reply back to this message and delete it from your system immediately, so that we can make sure that all such type of mistakes does not encounter in the future.
Why Add Disclaimer to All Outgoing Emails in Office 365?
Everyone has a different reason behind adding disclaimer to emails in Exchange Online. Therefore, in this section of the post, all possible reasons to apply for a disclaimer are sum up:
- Legal Protection - Email disclaimer provides all type of legal protection to an organization. Any type of confidentiality, security, liability, entering into contracts, misstatement issue can easily be avoided using a disclaimer in the email message. Moreover, it also prevents the actual occurrence of legal proceeding against an organization.
- Marketing Purposes - Another main motive of attaching a disclaimer is that it help in the marketing of an organization. One just needs to add an organization’s address, URL to the disclaimer. For example, it is also helpful in adding a footnote that contains a new coming fundraising or outreach campaign.
- Regulatory Compliance - In order to prevent the client privacy, the new and existing regulations are used. Moreover, it is also used to keep the record of email communications and ensure the secure confidentiality of information. Thus, to accomplish all this, it is necessary for an organization to add disclaimers at the bottom of their emails to make sure the integrity of their patients or clients and to overcome any confidentiality failures.
Method to Add Disclaimer to All Outgoing Emails in Office 365
In order to add Exchange Online disclaimer signature, one can make use of Office 365 Transport Rule. Follow the steps mentioned below to create a disclaimer that is added to the bottom of all emails sent from an organization:
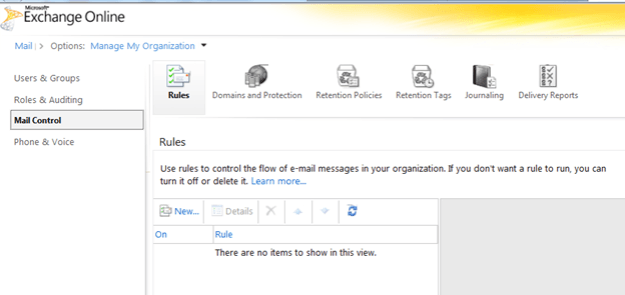
1. Open Exchange Control Panel and choose the Manage My Organization >> Mail Control >> Rules option

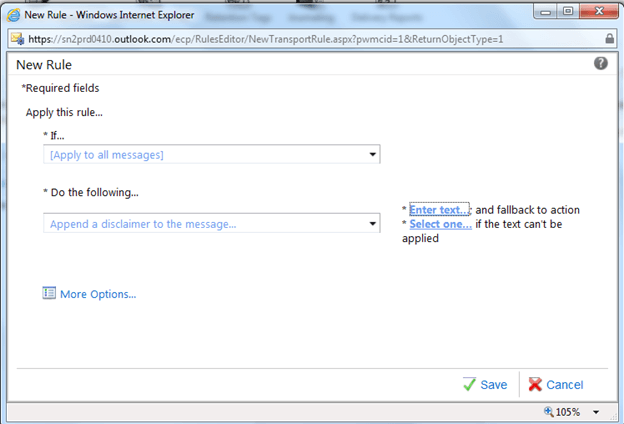
2. After that, click on New option and enter the information required in the New Rule window:
From the * If… drop-down menu, choose Apply to all messages option
From then * Do the following… drop-down list, choose Append a disclaimer to the message… option

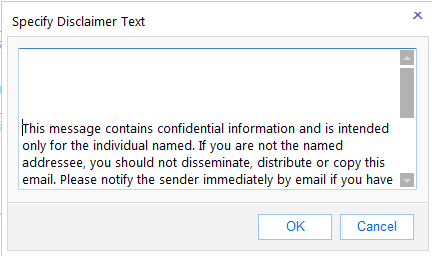
3. Now, click on Enter text… option, type the text of disclaimer to enter the disclaimer text and click OK

4. Click Select one… option
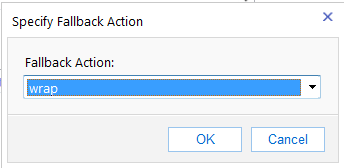
5. Now, choose the fallback action that needs to be performed if the disclaimer is not applied to the message. The choices are:
Wrap: Create a new message enclosing the original message and the disclaimer is included in the new message.
Ignore: It will send the message without disclaimer
Reject: message is not sent and NDR is received by the sender
So, to add disclaimer anyhow, choose Wrap as the default action and then, click on the OK button

6. Now, you need to give name to the rule, enter any name except the default name, or enter a unique name for the rule
7. Then, click on Save button
8. Now, click on Yes option to apply rule to all future message

After this, the recipient will always receive a message with the disclaimer.
Important: If you want to add a disclaimer to only particular department, then follow the steps below:
1. In the New Rule window, click on the More Options...
2. Then, click on Add condition option
3. Now, choose The sender… & is a member of the group option, and then you need to choose the group corresponding to the department.
Wrapping It Up
Attaching a disclaimer at the bottom of the email messages is the most important activity that needs to be done by all organization for security, liability, and marketing purpose. Thus, after understanding the need of adding disclaimer, a simple and easy method to add disclaimer to all outgoing emails in Office 365 account. A user can easily use this method discussed above without any expert help. Moreover, the method also allows users to apply a disclaimer to specific group without any hassle.
I hope you enjoyed this guest post by Tej Pratap Shukla. If you're interested in being a guest blogger, get in touch with me (contact links at the bottom of this page).
-i
